最新要闻
- 天天速看:深圳居住登记信息服务_深圳市居住登记服务平台
- 焦点播报:游客为拍照不听劝阻喂狐狸吃面包 无视劝阻!会危害动物
- 播报:院线票房止步9000万:《中国乒乓》官宣3月17日登陆线上平台
- 华硕发布新款迷你主机:高配i7-13700H、配备雷电4
- 网传梅西要来 黄牛提前卖票!阿根廷国家足球队辟谣“中国行”
- 【新要闻】315白皮书:价格刺客成消费者年度最关注现象、购物平台为年度被投诉最多行业
- 环球时讯:西安机场为首次坐飞机旅客安排指引服务:佩戴专属手环 全程有人引导
- 速度10倍于普通U盘!联想小新原厂颗粒固态U盘发售:USB 3.2双口
- 12万买C6?想多了!雪铁龙都是套路:想提车先交29万
- 微贺卡
- 《黑暗荣耀2》热播!演员透露拍摄细节:剧里的蛇是真蛇
- 82版《西游记》编剧戴英禄逝世 六小龄童发文悼念
- 当前关注:理想汽车L8首批车主调研:300名中车主开BBA的最多
- 环球播报:国产车崛起 豪华车丝毫不怂:市场份额继续增 有钱人多
- 最新资讯:努比亚Z50 Ultra首销卖爆:获京东/天猫平台销量销售额冠军
- 卡塔尔世界杯官方授权:富光1.5L顿顿桶29元发车
手机

iphone11大小尺寸是多少?苹果iPhone11和iPhone13的区别是什么?
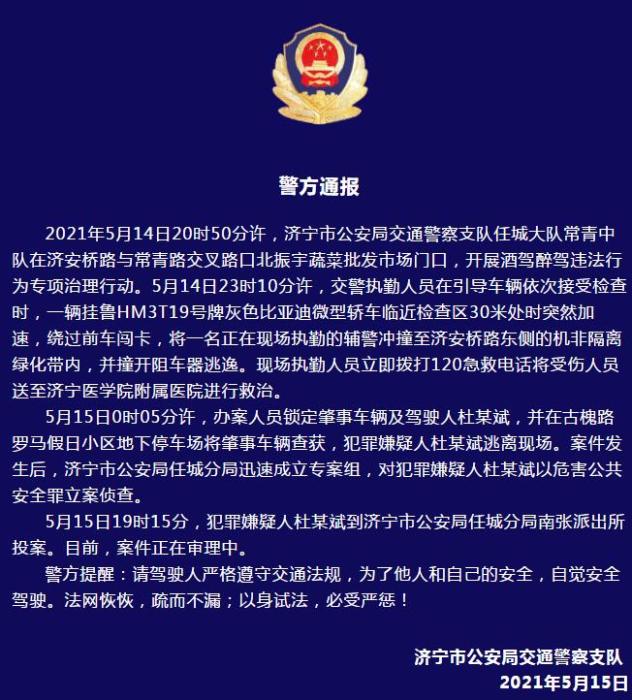
警方通报辅警执法直播中被撞飞:犯罪嫌疑人已投案
- iphone11大小尺寸是多少?苹果iPhone11和iPhone13的区别是什么?
- 警方通报辅警执法直播中被撞飞:犯罪嫌疑人已投案
- 男子被关545天申国赔:获赔18万多 驳回精神抚慰金
- 3天内26名本土感染者,辽宁确诊人数已超安徽
- 广西柳州一男子因纠纷杀害三人后自首
- 洱海坠机4名机组人员被批准为烈士 数千干部群众悼念
家电


当前通讯!day03-分析SpringBoot底层机制
分析SpringBoot底层机制
Tomcat启动分析,Spring容器初始化,Tomcat如何关联Spring容器?
 (资料图片仅供参考)
1.创建SpringBoot环境
(1)创建Maven程序,创建SpringBoot环境
(2)pom.xml导入SpringBoot的父工程和依赖
spring-boot-starter-parent org.springframework.boot 2.5.3 org.springframework.boot spring-boot-starter-web (3)创建主程序MainApp.java
package com.li.springboot;import org.springframework.boot.SpringApplication;import org.springframework.boot.autoconfigure.SpringBootApplication;import org.springframework.context.ConfigurableApplicationContext;/** * @author 李 * @version 1.0 */@SpringBootApplication//表示SpringBoot项目public class MainApp { public static void main(String[] args) { //启动SpringBoot项目 ConfigurableApplicationContext ioc = SpringApplication.run(MainApp.class, args); }}(4)启动项目,我们可以注意到Tomcat也随之启动了。
问题一:当我们执行run方法时,为什么会启动我们内置的tomcat?它的底层是如何实现的?
2.Spring容器初始化(@Configuration+@Bean)
我们知道,如果在一个类上添加了注解@Configuration,那么这个类就会变成配置类;配置类中通过@Bean注解,可以将方法中 new 出来的Bean对象注入到容器中,该bean对象的id默认为方法名。
配置类本身也会作为bean注入到容器中
容器初始化的底层机制仍然是我们之前分析的Spring容器的机制(IO/文件扫描+注解+反射+集合+映射)
对比:
- Spring通过@ComponentScan,指定要扫描的包;而SpringBoot默认从主程序所在的包开始扫描,同时也可以指定要扫描的包(scanBasePackages = {"xxx.xx"})。
- Spring通过xml或者注解,指定要注入的bean;SpringBoot通过扫描配置类(对应spring的xml)的@Bean或者注解,指定注入bean
3.SpringBoot怎样启动Tomcat,并能支持访问@Controller?
由前面的例子1中可以看到,当启动SpringBoot时,tomcat也会随之启动。那么问题来了:
- SpringBoot是怎么内嵌Tomcat,并启动Tomcat的?
- 而且底层是怎样让@Controller修饰的控制器也可以被访问的?
3.1源码分析SpringApplication.run()
SpringApplication.run()方法会完成两个重要任务:
- 创建容器
- 容器的刷新:包括参数的刷新+启动Tomcat
(1)创建一个控制器
package com.li.springboot.controller;import org.springframework.web.bind.annotation.RequestMapping;import org.springframework.web.bind.annotation.RestController;/** * @author 李 * @version 1.0 * HiController被标注后,作为一个控制器注入容器中 */@RestController//相当于@Controller+@ResponseBodypublic class HiController { @RequestMapping("/hi") public String hi() { return "hi,HiController"; }}(2)启动主程序MainApp.java,进行debug
(3)首先进入SpringApplication.java的run方法
(4)点击step into,进入如下方法
public ConfigurableApplicationContext run(String... args) { ... try { ... context = this.createApplicationContext();//严重分析,创建容器 context.setApplicationStartup(this.applicationStartup); this.prepareContext(bootstrapContext, context, environment, listeners, applicationArguments, printedBanner); this.refreshContext(context);//刷新应用上下文,比如初始化默认设置/注入相关bean/启动Tomcat this.afterRefresh(context, applicationArguments); stopWatch.stop(); ... } catch (Throwable var10) {...} ...}(5)分别对 **createApplicationContext() **和 refreshContext(context)方法进行分析:
(5.1)step into 进入 **createApplicationContext() ** 方法中:
//springApplication.java//容器类型很多,会根据你的this.webApplicationType创建对应的容器,默认this.webApplicationType//的类型为SERVLET,也就是web容器(可以处理servlet)protected ConfigurableApplicationContext createApplicationContext() { return this.applicationContextFactory.create(this.webApplicationType);}(5.2)点击进入下一层
//接口 ApplicationContextFactory.java//该方法根据webApplicationType创建不同的容器ApplicationContextFactory DEFAULT = (webApplicationType) -> { try { switch(webApplicationType) { case SERVLET://默认进入这一分支,返回 //AnnotationConfigServletWebServerApplicationContext容器 return new AnnotationConfigServletWebServerApplicationContext(); case REACTIVE: return new AnnotationConfigReactiveWebServerApplicationContext(); default: return new AnnotationConfigApplicationContext(); } } catch (Exception var2) { throw new IllegalStateException("Unable create a default ApplicationContext instance, you may need a custom ApplicationContextFactory", var2); }};总结:createApplicationContext()方法中创建了容器,但是还没有将bean注入到容器中。
(5.3)step into 进入 refreshContext(context)方法中:
//springApplication.javaprivate void refreshContext(ConfigurableApplicationContext context) { if (this.registerShutdownHook) { shutdownHook.registerApplicationContext(context); } this.refresh(context);//核心,真正执行相关任务}(5.4)在this.refresh(context);这一步进入下一层:
//springApplication.javaprotected void refresh(ConfigurableApplicationContext applicationContext) { applicationContext.refresh();}(5.5)继续进入下一层:
protected void refresh(ConfigurableApplicationContext applicationContext) { applicationContext.refresh();}(5.6)继续进入下一层:
//ServletWebServerApplicationContext.javapublic final void refresh() throws BeansException, IllegalStateException { try { super.refresh(); } catch (RuntimeException var3) { WebServer webServer = this.webServer; if (webServer != null) { webServer.stop(); } throw var3; }}(5.7)在super.refresh();这一步进入下一层:
//AbstractApplicationContext.java@Overridepublic void refresh() throws BeansException, IllegalStateException { synchronized (this.startupShutdownMonitor) { StartupStep contextRefresh = this.applicationStartup.start("spring.context.refresh"); ... try { ... // Initialize other special beans in specific context subclasses. //在上下文的子类初始化指定的bean onRefresh(); //当父类完成通用的工作后,再重新用动态绑定机制回到子类 ... } catch (BeansException ex) {...} finally {...} }}(5.8)在onRefresh();这一步step into,会重新返回上一层:
//ServletWebServerApplicationContext.javaprotected void onRefresh() { super.onRefresh(); try { this.createWebServer();//创建一个webserver,可以理解成创建我们指定的web服务-Tomcat } catch (Throwable var2) { throw new ApplicationContextException("Unable to start web server", var2); }}(5.9)在this.createWebServer();这一步step into:
//ServletWebServerApplicationContext.javaprivate void createWebServer() { WebServer webServer = this.webServer; ServletContext servletContext = this.getServletContext(); if (webServer == null && servletContext == null) { StartupStep createWebServer = this.getApplicationStartup().start("spring.boot.webserver.create"); ServletWebServerFactory factory = this.getWebServerFactory(); createWebServer.tag("factory", factory.getClass().toString()); this.webServer = factory.getWebServer(new ServletContextInitializer[]{this.getSelfInitializer()});//使用TomcatServletWebServerFactory创建一个TomcatWebServer createWebServer.end(); this.getBeanFactory().registerSingleton("webServerGracefulShutdown", new WebServerGracefulShutdownLifecycle(this.webServer)); this.getBeanFactory().registerSingleton("webServerStartStop", new WebServerStartStopLifecycle(this, this.webServer)); } else if (servletContext != null) { try { this.getSelfInitializer().onStartup(servletContext); } catch (ServletException var5) { throw new ApplicationContextException("Cannot initialize servlet context", var5); } } this.initPropertySources();}(5.10)在this.webServer = factory.getWebServer(new ServletContextInitializer[]{this.getSelfInitializer()});这一步step into:
//TomcatServletWebServerFactory.java会创建Tomcat,并启动Tomcatpublic WebServer getWebServer(ServletContextInitializer... initializers) { if (this.disableMBeanRegistry) { Registry.disableRegistry(); } Tomcat tomcat = new Tomcat();//创建了Tomcat对象,下面是一系列的初始化任务 File baseDir = this.baseDirectory != null ? this.baseDirectory : this.createTempDir("tomcat"); tomcat.setBaseDir(baseDir.getAbsolutePath()); Connector connector = new Connector(this.protocol); connector.setThrowOnFailure(true); tomcat.getService().addConnector(connector); this.customizeConnector(connector); tomcat.setConnector(connector); tomcat.getHost().setAutoDeploy(false); this.configureEngine(tomcat.getEngine()); Iterator var5 = this.additionalTomcatConnectors.iterator(); while(var5.hasNext()) { Connector additionalConnector = (Connector)var5.next(); tomcat.getService().addConnector(additionalConnector); } this.prepareContext(tomcat.getHost(), initializers); return this.getTomcatWebServer(tomcat);}(5.11)在return this.getTomcatWebServer(tomcat);这一步step into:
//TomcatServletWebServerFactory.java//这里做了端口校验,创建了TomcatWebServerprotected TomcatWebServer getTomcatWebServer(Tomcat tomcat) { return new TomcatWebServer(tomcat, this.getPort() >= 0, this.getShutdown());}(5.12)继续step into进入下一层
//TomcatServletWebServerFactory.javapublic TomcatWebServer(Tomcat tomcat, boolean autoStart, Shutdown shutdown) { this.monitor = new Object(); this.serviceConnectors = new HashMap(); Assert.notNull(tomcat, "Tomcat Server must not be null"); this.tomcat = tomcat; this.autoStart = autoStart; this.gracefulShutdown = shutdown == Shutdown.GRACEFUL ? new GracefulShutdown(tomcat) : null; this.initialize();//进行初始化,并启动tomcat}(5.13)this.initialize();继续step into:
//TomcatServletWebServerFactory.javaprivate void initialize() throws WebServerException { logger.info("Tomcat initialized with port(s): " + this.getPortsDescription(false)); synchronized(this.monitor) { try { this.addInstanceIdToEngineName(); Context context = this.findContext(); context.addLifecycleListener((event) -> { if (context.equals(event.getSource()) && "start".equals(event.getType())) { this.removeServiceConnectors(); } }); this.tomcat.start();//启动Tomcat! this.rethrowDeferredStartupExceptions(); try { ContextBindings.bindClassLoader(context, context.getNamingToken(), this.getClass().getClassLoader()); } catch (NamingException var5) { } this.startDaemonAwaitThread(); } catch (Exception var6) { this.stopSilently(); this.destroySilently(); throw new WebServerException("Unable to start embedded Tomcat", var6); } }}(6)一路返回上层,然后终于执行完refreshContext(context)方法,此时context为已经注入了bean
关键词:
-

-
当前通讯!day03-分析SpringBoot底层机制
分析SpringBoot底层机制Tomcat启动分析,Spring容器初始化,Tomcat如何关联Spring容器?1 创建SpringBo...
来源: -

关于AWS-S3-Bucket-Console-Web控制页面上的Creation date与命令行-API方式如何获取到真正的CreationDate
首先,说明一下,在AWSS3BucketConsoleweb界面看到的Createdate这个日期是真正的s3桶子的创建的日期当s3...
来源: -

每日观点:c++11多线程入门<学习记录>
当前通讯!day03-分析SpringBoot底层机制
关于AWS-S3-Bucket-Console-Web控制页面上的Creation date与命令行-API方式如何获取到真正的CreationDate
天天速看:深圳居住登记信息服务_深圳市居住登记服务平台
焦点播报:游客为拍照不听劝阻喂狐狸吃面包 无视劝阻!会危害动物
Vue——mergeOptions【四】
播报:院线票房止步9000万:《中国乒乓》官宣3月17日登陆线上平台
华硕发布新款迷你主机:高配i7-13700H、配备雷电4
环球热点评!.NET中比肩System.Text.Json序列化反序列化组件MessagePack
路飞-项目上线
今亮点!分布式架构-可观测性-事件日志
【全球热闻】教你用Python画个可爱的皮卡丘!(附完整源码)
每日资讯:Educational Codeforces Round 123 (Rated for Div. 2)
网传梅西要来 黄牛提前卖票!阿根廷国家足球队辟谣“中国行”
【新要闻】315白皮书:价格刺客成消费者年度最关注现象、购物平台为年度被投诉最多行业
环球时讯:西安机场为首次坐飞机旅客安排指引服务:佩戴专属手环 全程有人引导
速度10倍于普通U盘!联想小新原厂颗粒固态U盘发售:USB 3.2双口
12万买C6?想多了!雪铁龙都是套路:想提车先交29万
记录--你不知道的forEach函数
智能勘探 | AIRIOT智慧油田管理解决方案
环球聚焦:NOI春季测试游记
微贺卡
《黑暗荣耀2》热播!演员透露拍摄细节:剧里的蛇是真蛇
82版《西游记》编剧戴英禄逝世 六小龄童发文悼念
当前关注:理想汽车L8首批车主调研:300名中车主开BBA的最多
环球播报:国产车崛起 豪华车丝毫不怂:市场份额继续增 有钱人多
最新资讯:努比亚Z50 Ultra首销卖爆:获京东/天猫平台销量销售额冠军
报道:第一章 软件工程概述
每日看点!centos7.9离线升级openssl和openssh9.2
python语言基础
每日焦点!Mysql数据库未添加索引引发的生产事故
对极几何的理解和原理推导
卡塔尔世界杯官方授权:富光1.5L顿顿桶29元发车
焦点精选!零碳排放!我国首款双源智能重卡成功下线:自带大辫子
视焦点讯!全球打广告最划算的一块屏?登上纽约时代广场屏幕只需40美元
《狂飙》后 张译宣传新剧《他是谁》:今晚优酷、央视开播
获赔近100万 报废奔驰翻新再销售被判退1赔3 网友:C级秒变大S
每日快讯!10Wqps 超高并发 API网关 架构演进之路
Egg.js 学习笔记01
世界快看:git提交规范
【全球速看料】早起、冥想、阅读、写作、运动
焦点讯息:观察者模式——学习笔记
天天最新:dnf游戏闪退怎么解决方法_dnf游戏闪退
停车场闸机防骗能力太弱鸡:博主实测一部手机、一张纸均可通行
曾模仿东方甄选直播带货 好未来旗下学而思大规模重启线下招生
白皮书:购物平台为2022年度消费者投诉最多的行业
天天播报:315前海鲜加工厂的狠活被曝光:硼砂泡出黄金鲍 系明令禁止食品添加剂
世界焦点!两只售价3899元:华硕ROG推出魔方幻路由器月曜白限定版
卷起来!!!看了这篇文章我才知道MySQL事务&MVCC到底是啥?
蓝牙Mesh简介(一)设备标识:UUID和Mesh地址
开源免费:分享powershell读写k8s的etcd的脚本库
环球速递!冲击全球的“硅谷银行破产”到底咋回事?会不会引爆危机?
视点!国产AYA新掌机Ayaneo 2 IGN9分好评:价格贵 但很好用!
【聚看点】央视3·15晚会官宣明晚举办 这次谁会被曝光?
世界最资讯丨配置大升级!新款比亚迪唐DM-i/汉EV冰川蓝实车亮相:绝对吸睛
上海测试9辆自动驾驶清扫车 可替代25名环卫工人
干货来袭!3天0基础Python实战项目快速学会人工智能必学数学基础全套(含源码)(第3天)概率分析篇:条件概率、全概率与贝叶斯公式
韩国电视台剪掉杨紫琼获奖感言:鼓励女性部分没了
腾讯会议重大调整!取消免费300人不限时会议使用
世界看热讯:斥资10亿美元!NASA将开发太空拖船:实现国际空间站受控坠落
那些曾被315点过名的品牌怎么样了?英菲尼迪道歉并更换变速箱 汉堡王被罚
实时焦点:车圈大V杨学良晒魅族20 Pro真机:极简设计 好看又好用!
与微软聊天机器人对话
Vue项目迁移小程序,实操干货分享
戴尔PC要100%离开中国!完整时间表曝光:真着急
天天微资讯!韩媒称特斯拉停止与比亚迪合作 马斯克:虚假报道、双方关系积极
魔兽世界将推出全新硬核玩法:一命通关、挂了就得重来
ai文件怎么打开?ai文件用什么软件打开和编辑?
斐讯k1支持千兆吗?斐讯k1路由器怎么设置?
windows如何一键还原?windows截图保存在哪里?
声卡怎么调试?声卡什么牌子的音质比较好?
笔记本fn键在哪里?fn键怎么开启和关闭?
每日短讯:可插拔组件设计机制—SPI
今日热讯:Vim 备忘清单_开发速查表分享
世界头条:Linux进程的创建与销毁
鲨鱼求偶被误认吃“同事” 官方回应:是繁殖行为 撕咬有分寸
天天热文:减肥不吃主食?医生提醒:可致大脑功能衰退
全球热消息:《小丑2》Lady Gaga小丑女新片场照 造型太好看了
全球报道:极速直追中国高铁!碳陶瓷刹车套件特斯拉Model S Plaid打破单圈纪录
【全球报资讯】一键开盖:哈尔斯600ml水杯9.9元狂促 Tritan材质款23.9元
天天热头条丨阳高县气象台发布大风蓝色预警【Ⅳ级/一般】
全球微头条丨java操作excel文件——POI
天天讯息:剑指 Offer 68 - II. 二叉树的最近公共祖先(java解题)
分布式架构-可观测性
obs studio 插件
看热讯:小米子公司发通告:拼多多、京东、淘宝上的“紫米官旗”不是我
硅谷银行停业没影响!贾跃亭要“翻身”:4月26日FF91终极发布
世界今日讯!德国反对2035禁售燃油车!欧盟做出让步:内燃机还有活路
天天观热点:Intel要求电源厂商使用单一规格制作12VHPWR接头
马斯克减肥神药遭疯抢!欧洲药管局警告:2023年都会短缺
天天热讯:DockQuery | 基于E-R图的数据建模功能使用实践
宝马iX3高速撞车 车主:车道纠偏系统和自己抢方向盘酿事故
环球最新:公司回应因给客户倒水太满开除员工:该走啥程序走啥程序
新机型“无可奉告”:任天堂称对Switch未来充满信心
【全球速看料】史上最大规模!魅族领克无界生态发布会官宣:魅族20系列、Flyme 10来了
全球视点!一加逆袭!成为2023年销量增速最快的品牌:友商普遍下滑
共314套房源!昌平区公租房配租公告来了
焦点资讯:GO语言学习笔记-测试篇 Study for Go ! Chapter ten- Test
要闻速递:面试官:怎么删除 HashMap 中的重复元素?第 3 种实现思路,99% 的人不会!
世界快消息!k8s的Helm 工具安装