最新要闻
- 通讯!旃怎么读音(旃怎么读)
- 36年前电脑用上AI:IBM 5155运行ChatGPT是什么样?
- 环球看热讯:清晰度和功耗完美平衡!真我GT Neo5系列宣布告别1080P:普及1.5K屏
- 罕见!超级火流星划过北京夜空被拍下:彩色拖尾 爆裂闪光
- 每日快讯!《生化危机4:重制版》阿什莉模型展示:物理晃动效果很优秀
- 全球快看点丨车评人曝奔驰4S维修黑幕:一个迈巴赫大灯小20万 故意损坏夸大车损
- 天天快报!越来越没人买了?雷克萨斯国内销量出炉:同比爆降36%
- 女子给猴子喂食被掌掴 景区回应:含保险、打疫苗可理赔
- 全球看热讯:去年火遍全网!贵州“村BA”现场水泄不通:村草村花“蹦苗迪”
- 热资讯!最高等级!英国最大陆上油田漏油:已成立黄金指挥部
- 头条焦点:消息称百度文心一言云服务发布会取消:延期对外发布
- 焦点快看:2023年底产能破30GW!协鑫集成阜宁12GW组件项目开工 -->
- 最新资讯:微软或提高Win12升级门槛:SSD成为刚需
- 19.48万元起 国产豪华轿车红旗H6预售:双中置排气着实罕见
- 焦点速看:赵长江:腾势D9新增订单一天破500台!别克GL8危险了
- 【世界播资讯】只差价格了 Redmi新机爆料汇总 1999元起交个朋友?
手机

iphone11大小尺寸是多少?苹果iPhone11和iPhone13的区别是什么?
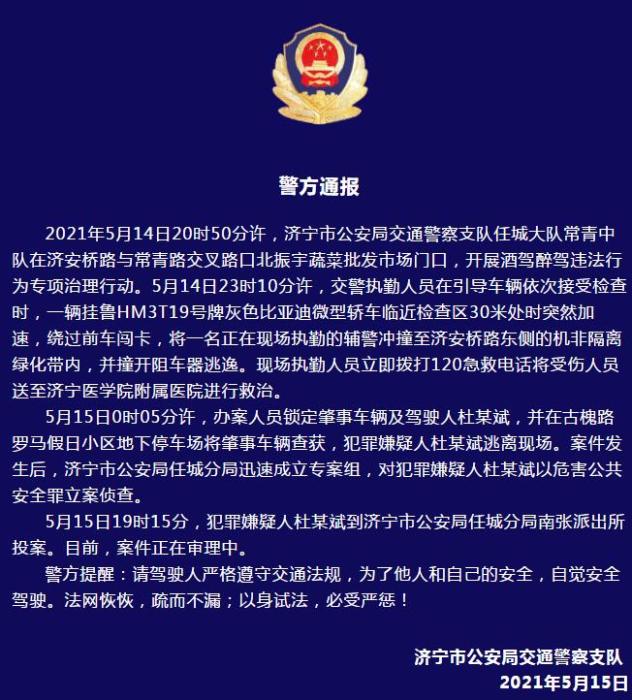
警方通报辅警执法直播中被撞飞:犯罪嫌疑人已投案
- iphone11大小尺寸是多少?苹果iPhone11和iPhone13的区别是什么?
- 警方通报辅警执法直播中被撞飞:犯罪嫌疑人已投案
- 男子被关545天申国赔:获赔18万多 驳回精神抚慰金
- 3天内26名本土感染者,辽宁确诊人数已超安徽
- 广西柳州一男子因纠纷杀害三人后自首
- 洱海坠机4名机组人员被批准为烈士 数千干部群众悼念
家电


天天百事通!OpenIddict使用教程
OpenIddict是一个ASP.NET Core身份验证库,可帮助您添加OpenID Connect和OAuth 2.0支持到ASP.NET Core应用程序中。下面是OpenIddict使用教程的步骤:
 (资料图)
(资料图)
安装OpenIddict,在项目中添加OpenIddict.Core和OpenIddict.EntityFrameworkCore Nuget包。
配置OpenIddict,在Startup.cs文件中添加OpenIddict服务的配置。您可以选择使用内存或EFCore进行配置。以下是使用EF Core进行配置的示例:
services.AddDbContext(options =>{ options.UseSqlServer(Configuration.GetConnectionString("DefaultConnection")); options.UseOpenIddict();});services.AddCustomOpenIddictApplication();services.AddCustomOpenIddictAuthorization();services.AddCustomOpenIddictScope();services.AddCustomOpenIddictToken();services.AddCustomOpenIddictValidation();services.AddCustomOpenIddictUser();services.AddOpenIddict() .AddCore(options => { options.UseEntityFrameworkCore() .UseDbContext() .ReplaceDefaultEntities(); }) .AddServer(options => { options.UseMvc(); options.EnableAuthorizationEndpoint("/connect/authorize") .EnableLogoutEndpoint("/connect/logout") .EnableTokenEndpoint("/connect/token") .EnableUserinfoEndpoint("/connect/userinfo"); options.RegisterScopes("openid", "profile", "email", "offline_access"); options.AllowImplicitFlow(); options.DisableHttpsRequirement(); options.AddSigningCertificate(File.ReadAllBytes(Configuration["Auth:Certificates:Path"]), Configuration["Auth:Certificates:Password"]); options.DisableAccessTokenEncryption(); options.SetAccessTokenLifetime(TimeSpan.FromHours(6)); }); - 添加授权策略,在Startup.cs文件添加需要的授权策略。以下是一个例子:
services.AddAuthorization(options =>{ options.AddPolicy("EmployeeOnly", policy => policy.RequireClaim("EmployeeNumber")); options.AddPolicy("AdministratorOnly", policy => policy.RequireRole("Administrator"));});- 在您的应用程序中使用OpenIddict,您可以使用OpenIddict来实现您的OAuth 2.0或OpenID Connect需求。以下是一些常见的用例:
4.1 登录页面
使用OpenIddict进行身份验证,您可以使用如下代码在您的控制器中。您可以使用请求重定向到触发OpenID Connect流:
[HttpGet("~/login")]public IActionResult Login(){ var request = HttpContext.GetOpenIddictServerRequest(); return View(new LoginViewModel { Nonce = RandomNumberGenerator.GetInt32(), ReturnUrl = request.RedirectUri, Ticket = request.GetOpenIddictServerTransactionId(), });}[HttpPost("~/login")]public IActionResult Login(LoginViewModel model){ if (ModelState.IsValid) { var user = await _userManager.FindByNameAsync(model.Username); if (user == null) { ModelState.AddModelError("Username", "Username or password is incorrect."); } else if (!await _userManager.IsEmailConfirmedAsync(user)) { ModelState.AddModelError("Email", "You must have a confirmed email to log in."); } else if (!await _userManager.CheckPasswordAsync(user, model.Password)) { ModelState.AddModelError("Username", "Username or password is incorrect."); } else { // 创建一个新的身份验证票据. var ticket = await CreateTicketAsync(user); return SignIn(ticket.Principal, ticket.Properties, ticket.AuthenticationScheme); } } ViewData["returnUrl"] = model.ReturnUrl; ViewData["nonce"] = model.Nonce; ViewData["transactionId"] = model.Ticket; return View(model);}4.2 注册页面
您还可以使用OpenIddict来实现您的注册页面。以下是一个例子:
[HttpGet("~/register")]public IActionResult Register(){ return View();}[HttpPost("~/register")]public async Task Register(RegisterViewModel model){ if (ModelState.IsValid) { var user = new ApplicationUser { UserName = model.Email, Email = model.Email, FirstName = model.FirstName, LastName = model.LastName, }; var result = await _userManager.CreateAsync(user, model.Password); if (result.Succeeded) { var code = await _userManager.GenerateEmailConfirmationAsync(user); var callbackUrl= Url.Action("ConfirmEmail", "Account", new { userId = user.Id, code = code }, protocol: HttpContext.Request.Scheme); await _emailSender.SendEmailAsync(model.Email, "Confirm your email", $"Please confirm your account by clicking this link: {callbackUrl}"); return RedirectToAction(nameof(RegisterConfirmation)); } foreach (var error in result.Errors) { ModelState.AddModelError("Email", error.Description); } } return View(model);}[HttpGet("~/register/confirmation")]public IActionResult RegisterConfirmation(){ return View();} 4.3 访问受保护的资源
最后,您可以使用OpenIddict来实现访问受保护资源的身份验证和授权。以下是一个例子:
[HttpGet("~/manager")][Authorize(Roles = "Manager")]public IActionResult ManagerDashboard(){ return View();}[HttpGet("~/employee")][Authorize(Policy = "EmployeeOnly")]public IActionResult EmployeeDashboard(){ return View();}[HttpGet("~/administrator")][Authorize(Policy = "AdministratorOnly")]public IActionResult AdministratorDashboard(){ return View();}- 通过OpenIddict实现Token刷新
当访问受保护的API时,您可以使用OpenIddict来实现使用token刷新。以下是实现Token刷新的一个示例方法:
[HttpPost("~/api/token/refresh")]public async Task Refresh([FromForm]string refreshToken){ var info = await HttpContext.AuthenticateAsync(OpenIddictServerDefaults.AuthenticationScheme); if (info == null) { return BadRequest(new { error = OpenIddictConstants.Errors.InvalidRequest, error_description = "The refresh token is no longer valid." }); } var principal = info.Principal; var user = await _userManager.GetUserAsync(principal); if (user == null) { return BadRequest(new { error = OpenIddictConstants.Errors.InvalidRequest, error_description = "The refresh token is no longer valid." }); } // 确保刷新令牌没有被撤销. if (!await _tokenManager.ValidateAsync( principal.GetId(), principal.GetClaim(OpenIddictConstants.Claims.JwtId))) { return BadRequest(new { error = OpenIddictConstants.Errors.InvalidRequest, error_description = "The refresh token is no longer valid." }); } // 从数据库得到客户端应用程序详细信息 var application = await _applicationManager.FindByClientIdAsync( principal.GetClaim(OpenIddictConstants.Claims.ClientId)); if (application == null) { return BadRequest(new { error = OpenIddictConstants.Errors.InvalidRequest, error_description = "The client application associated with this token is no longer valid." }); } var identity = await _userManager.CreateIdentityAsync(user, principal.GetScopes()); var ticket = await CreateTicketAsync(application, identity, principal); return SignIn(ticket.Principal, ticket.Properties, ticket.AuthenticationScheme);} - 通过OpenIddict实现密码恢复流程OpenIddict还可以实现忘记密码流程的重置密码,以下是一个简单的示例:
[HttpPost("~/forgot-password")][AllowAnonymous]public async Task ForgotPassword([FromForm] string email){ var user = await _userManager.FindByEmailAsync(email); if (user == null) { // 不要显示用户不存在,懂的都懂~ return Ok(); } var code = await _userManager.GeneratePasswordResetTokenAsync(user); code = WebEncoders.Base64UrlEncode(Encoding.UTF8.GetBytes(code)); var callbackUrl = Url.Action("ResetPassword", "Account", new { userId = user.Id, code = code }, protocol: HttpContext.Reque await _emailSender.SendEmailAsync( email, "Password Reset", $"Please reset your password by clicking here: link."); return Ok();}[HttpGet("~/reset-password")][AllowAnonymous]public IActionResult ResetPassword(string code = null, string userId = null){ return View(new ResetPasswordViewModel { Code = code, UserId = userId });}[HttpPost("~/reset-password")][AllowAnonymous]public async Task ResetPassword([FromForm] ResetPasswordViewModel model){ if (!ModelState.IsValid) { return View(model); } var user = await _userManager.FindByIdAsync(model.UserId); if (user == null) { // 不要显示用户不存在 return View("ResetPasswordConfirmation"); } var decodedCode = Encoding.UTF8.GetString(WebEncoders.Base64UrlDecode(model.Code)); var result = await _userManager.ResetPasswordAsync(user, decodedCode, model.Password); if (result.Succeeded) { return RedirectToAction(nameof(ResetPasswordConfirmation)); } foreach (var error in result.Errors) { ModelState.AddModelError(string.Empty, error.Description); } return View(model);}[HttpGet("~/reset-password-confirmation")][AllowAnonymous]public IActionResult ResetPasswordConfirmation(){ return View();} - 使用OpenIddict实现自定义Token发布方案
OpenIddict支持自定义Token发布方案,以适应各种需求。在以下示例中,我们将实现自定义发布方案来控制Token的过期时间:
public class CustomTokenEndpointHandler : OpenIddictServerHandler{ public CustomTokenEndpointHandler(IServiceProvider services) : base(services) { } public override async Task HandleAsync([NotNull] OpenIddictServerHandleContext context) { if (context == null) { throw new ArgumentNullException(nameof(context)); } // 从数据库检索客户机应用程序. var application = await context.HttpContext.GetOpenIddictServerApplicationAsync(); if (application == null) { throw new InvalidOperationException("The client application cannot be retrieved."); } // 从授权服务器设置检索用户主体. var principal = context.HttpContext.User; // 确保允许应用程序使用指定的授权类型。 if (!await ValidateClientRedirectUriAsync(application, context.Request)) { throw new InvalidOperationException("The grant type is not allowed for this application."); } //注意:这个自定义令牌终端点总是忽略“scopes”参数,并根据授予的scopes/roles自动定义声明。 var ticket = new AuthenticationTicket(principal, new AuthenticationProperties(), OpenIddictServerDefaults.AuthenticationScheme); // 根据请求的自定义授权类型自定义令牌生命周期. if (string.Equals(context.Request.GrantType, "urn:custom_grant", StringComparison.OrdinalIgnoreCase)) { // Set the token expiration to 1 hour. ticket.Properties.ExpiresUtc = context.Options.SystemClock.UtcNow.AddHours(1); } else { // 将令牌过期时间设置为默认持续时间(5分钟) ticket.Properties.ExpiresUtc = context.Options.SystemClock.UtcNow.Add( context.Options.AccessTokenLifetime ?? TimeSpan.FromMinutes(5)); } context.Logger.LogInformation("The custom token request was successfully processed."); await context.HttpContext.SignInAsync(ticket.Principal, ticket.Properties, ticket.AuthenticationScheme); // 将响应标记为已处理,以跳过管道的其余部分. context.HandleRequest(); }} 您需要将其添加到OpenIddict配置中:
services.AddOpenIddict() .AddCore(options => { // ... }) .AddServer(options =>{ // ... options.Handlers.Add(new CustomTokenEndpointHandler(services)); // ...}).AddValidation(options =>{ // ...});此时,您可以使用urn:custom_grant授权类型来发出过期时间为1小时的Token,这可以通过以下方式完成:
var client = new HttpClient();var request = new HttpRequestMessage(HttpMethod.Post, "http://localhost:5000/connect/token");request.Content = new FormUrlEncodedContent(new Dictionary{ ["grant_type"] = "urn:custom_grant", ["client_id"] = "your_client_id", ["client_secret"] = "your_client_secret", ["scope"] = "your_scopes_separated_by_spaces"});var response = await client.SendAsync(request);var payload = await response.Content.ReadAsStringAsync(); 总结
本文介绍了如何使用OpenIddict创建一个基本的身份验证和授权服务器。当然,在实现身份验证和授权服务器时有很多细节需要考虑,例如维护安全性、处理错误、管理用户和客户端应用程序等。希望这篇文章对您有所帮助!
关键词:
-
天天百事通!OpenIddict使用教程
OpenIddict是一个ASP NETCore身份验证库,可帮助您添加OpenIDConnect和OAuth2 0支持到ASP NETCore应...
来源: -

-

全球观速讯丨MySql随笔记基础
XAMPP使用shell命令每个数据库对应一个子文件夹mysql进入mySQL的命令-urootuserroot登录用户-uroot-ppassword登录密码-p123
来源: -

【高端访谈】强化城投债与量化领域主动管理 打造私募“固收+”独特策略——专访国恩资本董事总经理杨先哲
城投债市场是金融支持实体经济的重要方面,而金融支持实体经济的前提是金融市场的定价有效。二级市场的...
来源: 天天百事通!OpenIddict使用教程
流量分析入门
全球观速讯丨MySql随笔记基础
【高端访谈】强化城投债与量化领域主动管理 打造私募“固收+”独特策略——专访国恩资本董事总经理杨先哲
通讯!旃怎么读音(旃怎么读)
36年前电脑用上AI:IBM 5155运行ChatGPT是什么样?
环球看热讯:清晰度和功耗完美平衡!真我GT Neo5系列宣布告别1080P:普及1.5K屏
罕见!超级火流星划过北京夜空被拍下:彩色拖尾 爆裂闪光
每日快讯!《生化危机4:重制版》阿什莉模型展示:物理晃动效果很优秀
全球快看点丨车评人曝奔驰4S维修黑幕:一个迈巴赫大灯小20万 故意损坏夸大车损
即时:数据库系统原理之SQL与关系数据库基本操作
每日焦点!【解答】如何保障ETL过程的数据正确性。这个过程会产生哪些问题?
世界要闻:DHCP snooping
全球快播:SSH配置别名登录
天天快报!越来越没人买了?雷克萨斯国内销量出炉:同比爆降36%
女子给猴子喂食被掌掴 景区回应:含保险、打疫苗可理赔
全球看热讯:去年火遍全网!贵州“村BA”现场水泄不通:村草村花“蹦苗迪”
热资讯!最高等级!英国最大陆上油田漏油:已成立黄金指挥部
头条焦点:消息称百度文心一言云服务发布会取消:延期对外发布
焦点快看:2023年底产能破30GW!协鑫集成阜宁12GW组件项目开工 -->
Spring源码核心剖析
焦点热门:计算机解决高中离子浓度计算
最新资讯:微软或提高Win12升级门槛:SSD成为刚需
19.48万元起 国产豪华轿车红旗H6预售:双中置排气着实罕见
焦点速看:赵长江:腾势D9新增订单一天破500台!别克GL8危险了
【世界播资讯】只差价格了 Redmi新机爆料汇总 1999元起交个朋友?
环球动态:市场震荡分化 软件行业红利不断
【全球独家】你不知道的ubuntu DIY发行版
全球快消息!2022年度十大科学辟谣榜出炉:O型血更招蚊子是谣言、变电站很危险?
男子爬树看邓紫棋演唱会致手臂骨折 省1千花1万:网友直呼追星也要注意安全
华海诚科网上发行最终中签率为0.0363%
专家解读消费基础设施纳入公募REITs试点:推动消费扩容提质 并非简单为房企提供资产处置渠道
天天最新:主板注册制新股开启申购 投资者打新须适应新规则
今日观点!国际金融市场早知道:3月27日
速读:票房破3亿!新海城电影《铃芽之旅》拿下2023年引进片票房冠军
新一轮国内油价将于3月底调整:目前分析大概率下调
今日播报!头部车企打架尾部遭殃 恒驰汽车北京仅剩一家门店营业
读Java性能权威指南(第2版)笔记29_线程和同步性能下
【热闻】95后夫妻摆摊日入9千网友让查税慌了 本人回应:当日是偶然 但生意也不错
【环球新视野】ctf反序列化练题
全球新资讯:win32com操作word 第十五 Find接口的使用
院士:抗流感特效药“达菲”原料为八角茴香、附加值提升1100多倍
口碑并入高德:这是要和美团、抖音拼了?
速递!我国首次实现固态氢能发电并网!密度提高20倍
讯息:镗削
当前短讯!转注是什么_转注是什么意思
【Visual Leak Detector】QT 中 VLD 输出解析(三)
快报:北大"韦神"出难题:没想到 初二学生给出标准答案!ChatGPT被难倒
环球关注:MM32 SPIN MCU 电机 FOC 驱动 风机无传感器弦波驱动篇应用笔记
前端设计模式——路由模式
【全球新视野】Mysql 查询指定节点的所有子节点
当前动态:NVIDIA显卡突然解锁视频编码限制:9年前老卡欢呼雀跃
苹果自动驾驶数据曝光:2个月16起车祸
视觉SLAM中的三角化
计算机专业规划
最资讯丨青春期教育怎么写_青春期教育资料
胖东来回应给员工设超5000元委屈奖:鼓励做正确的事情
环球快资讯:PTA OOP第一次总结性作业
快消息!IO多路复用形象举例
新一代Java高性能构建工具Maven-mvnd【实践可行版】
全球短讯!老人的屋子里怎么总有一股怪怪的味道?小心这四种
最资讯丨AMD锐龙7000平台终于要便宜了!砍掉又贵又没用的PCIe 5.0
看热讯:gomock优化diff展示
即时:Xcode的Search Paths配置
天天速读:漫威超级大反派翻车!《蚁人3》男演员乔纳森梅杰斯被捕:攻击妇女
世界新消息丨深圳一立体车库禁停比亚迪 车主:赤裸裸歧视
环球头条:NAS容量告急 但没空余硬盘位怎么办?群晖教你换上新硬盘
天天视讯!煜邦电力: 关于向不特定对象发行可转换公司债券的审核问询函回复及募集说明书等申请文件更新财务数据的提示性公告
热门:JS 做一个简单的 Parser
【全球新视野】SCO音频采集
骁龙7+处理性能加持:Redmi Note 12 Turbo拍照加速50%
李彦宏:百度文心一言和ChatGPT差距也就一两个月
每日消息!虚幻5再次炸场!1部iPhone搞定3A大作级动作捕捉 游戏行业要变天
【全球快播报】高校回应考生因航班延误错过复试:通知合规 可按流程重新参加
天天视点!中国火箭回收新进展:每年可节省十几亿元
快看点丨yolov5训练自己的数据集
环球关注:有监督学习——决策树、集成学习
每日播报!定时任务的路径问题
视焦点讯!支持Win7运行最后版本:U盘软件Rufus 3.22正式发布
女子家中开氛围灯外面看如同着火 引来消防员场面十分尴尬
信息:003至薄套壁 杰士邦避孕套0.66元/枚狂促
世界热讯:永安林业:副董事长辞职
今日快看!简单部署halo博客
微速讯:Qt源码阅读(二) moveToThread
AES之CryptoJS加密与C#解密
环球观速讯丨肝帝玩家!《暗黑破坏神4》公测玩家达成全职业满级
男子高速奇葩操作:头上竟然套了一个“车顶”
热点评!股票除权日在什么时候
【环球新视野】软件测试--详细判断电话号码
前端设计模式——计算属性模式
世界速递!PLG SaaS 案例:如何实践外链自动增长策略?
需求分析报告(软件项目)
每日播报!Android中常见的线程池
环球观焦点:阿什莉动捕演员庆祝《生化危机4:重制版》发售 身穿黑丝超吸睛
今日精选:网络爽文改编 《赘婿》动画定档4月23日B站开播
全球球精选!加拿大旅游团费_加拿大旅游费用
小米顶级自研技术!Redmi Note 12 Turbo用上小米影像大脑
世界观点:.NET6+Quartz实现定时任务
当前观察:logback的使用和原理
【新视野】GPT已长出眼睛耳朵 周鸿祎:人工智能将会产生意识